The street does not care about your skill level or your tenure on two wheels. Whether you are a daily commuter or a weekend canyon carver, the physics of a crash remain the same: impact energy and abrasion friction.
You have heard the adage, “Dress for the slide, not the ride.” This guide moves beyond the cliché to the technical reality of modern armored motorcycle gear. We will break down the mechanics of energy dispersion, the materials that separate your skin from the asphalt, and how to select a loadout that provides maximum survivability without compromising control.
The Mechanics of Armored Motorcycle Gear Protection
Armored motorcycle gear is a specialized safety system integrating impact-absorbing polymers and abrasion-resistant textiles to minimize trauma during a crash. Unlike standard clothing, it actively manages kinetic energy to reduce fracture risks and prevent severe road rash.
Standard leather or heavy denim offers passive abrasion resistance, but it does nothing to mitigate the blunt force trauma of hitting the pavement. Effective armored motorcycle gear introduces an active safety system designed to manage kinetic energy.
Impact Management
When you go down, your joints—elbows, shoulders, knees, and hips—usually take the first hit. Protective inserts (armor) function by compressing and dispersing that focused energy across a wider surface area. This reduces the peak force transferred to the bone, significantly lowering the risk of fractures. According to the NHTSA, lower-extremity injuries are the most common in motorcycle crashes, making this dispersion a critical function of quality armored motorcycle gear.
Abrasion Defense
Once the impact is absorbed, the slide begins. Professional-grade armored motorcycle gear utilizes high-tenacity fibers and textiles engineered to withstand friction heat and tearing forces, maintaining structural integrity until you come to a stop.
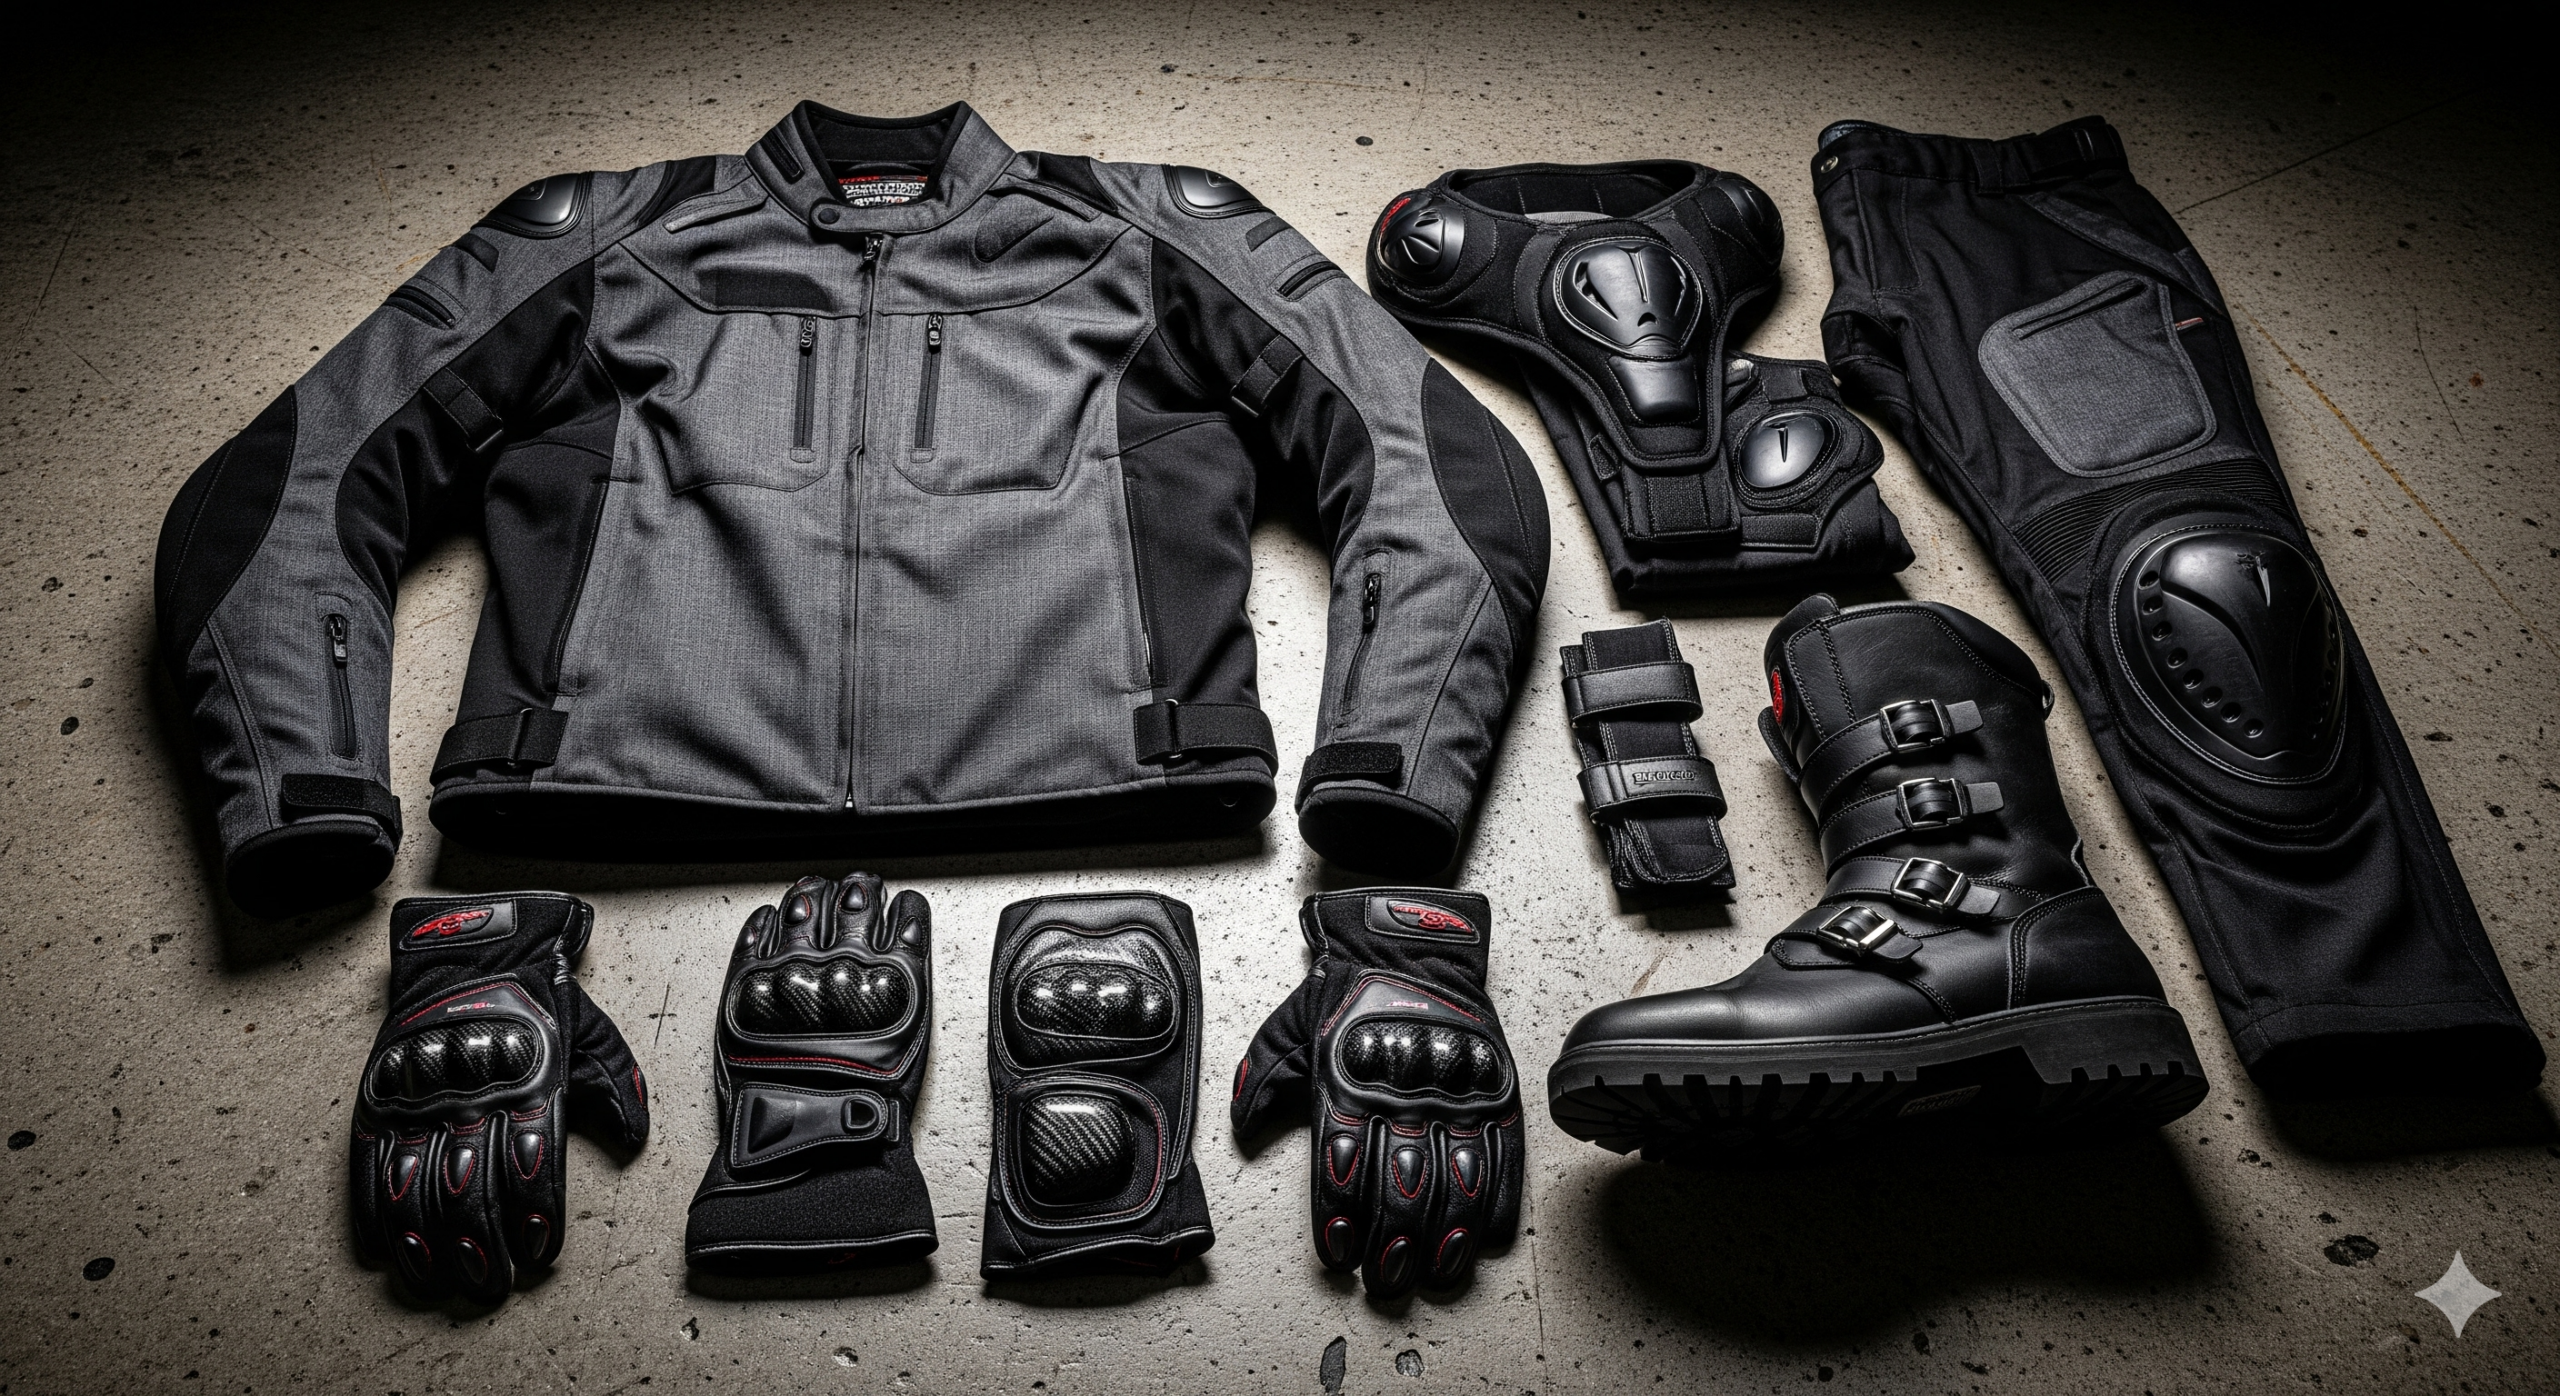
The Loadout: Essential Components
1. The Jacket: Upper Body Chassis
A proper riding jacket is the foundation of your armored motorcycle gear loadout. It protects the vital organs and the spinal column. When selecting a jacket, prioritize these elements:
- Back Protection: Many stock jackets come with a foam pad placeholder. Upgrade this immediately to a CE Level 2 certified back protector to safeguard the spine.
- Impact Zones: Ensure armor is present and securely seated at the shoulders and elbows. If the armor can rotate easily, it will not protect you during a slide.
- Chassis Material: Look for heavy-gauge leather or high-denier textiles (600D or higher) to prevent road rash.
2. Trousers: Lower Extremity Defense
Standard denim shreds instantly upon contact with asphalt at speed. Dedicated riding trousers are non-negotiable for a complete armored motorcycle gear setup.
- Knee and Hip Armor: These are high-probability impact points. Ensure the armor sits correctly when you are in the riding position, not just when standing.
- Reinforced Panels: Look for Aramid or Kevlar linings in the seat, hips, and knees.
3. Gloves: Tactile Control and Scaphoid Protection
Human instinct is to break a fall with the hands. Consequently, hand injuries are the most common result of a get-off, making gloves an indispensable part of your armored motorcycle gear.
- Scaphoid Sliders: Hard plastic sliders on the palm allow the hand to slide rather than grip the pavement, preventing wrist hyperextension and scaphoid breaks.
- Knuckle Guards: Hard armor on the knuckles protects against impact and crushing injuries.
- Pre-curved Construction: Reduces grip fatigue, ensuring you maintain precise throttle and brake control.
4. Boots: Crush and Torsion Support
Sneakers provide zero protection. A proper riding boot safeguards the complex structure of the foot and ankle.
- Torsional Stiffness: The sole should not twist. This prevents ankle dislocation if the bike falls on your leg.
- Malleolus Protection: Armor discs over the ankle bone prevent grinding injuries during a slide.
Technical Materials Briefing
Understanding the spec sheet is crucial to verifying the quality of your armored motorcycle gear. Here are the industry-standard materials you should look for:
- D3O®: A non-Newtonian polymer. In its resting state, it is soft and flexible for comfort. Upon impact, the molecules instantly lock together to absorb and disperse energy. It is the gold standard for low-profile, high-performance impact protection.
- Kevlar® / Aramid Fibers: Synthetic fibers with a high tensile strength-to-weight ratio. Used in liners to provide extreme heat and abrasion resistance.
- Cordura®: A high-tenacity nylon fabric known for durability and resistance to scuffs and tears. Look for 500D or 1000D ratings for optimal protection.
Selection Strategy: Fitment is Critical
Even the most expensive armored motorcycle gear is useless if it does not fit correctly. Loose armor shifts away from the impact zone during a crash. Tight gear restricts blood flow and movement, causing fatigue.
The Fit Check:
- Snug is Safe: Your armored motorcycle gear should fit tighter than casual clothing. It needs to hold the armor firmly against your body.
- Test in Position: Do not just look in the mirror. Sit on your bike. Ensure sleeves cover your wrists when reaching for the bars and that pant cuffs do not ride up over your boots.
- Check Rotations: Grab the elbow or knee armor and try to push it aside. If you can easily move it off the joint, you need a smaller size or a better strapping system.
Quick Reference: Gear Specification Table
| Gear Component | Critical Function | Target Materials | Operational Context |
|---|---|---|---|
| Armored Jacket | Spine & Organ Protection | High-Denier Cordura, Leather, CE Lvl 2 Inserts | All riding disciplines. |
| Technical Pants | Abrasion & Knee Impact | Kevlar Lining, Hip Armor | Crucial for slide protection. |
| Gauntlet Gloves | Wrist & Scaphoid Defense | Goatskin/Kangaroo Leather, Palm Sliders | Impact protection & control retention. |
| Riding Boots | Crush & Torsion Prevention | Reinforced Shank, Ankle Discs | Prevents fractures from bike weight. |
Frequently Asked Questions
Is “regular” leather enough?
Fashion leather lacks the thickness, stitching strength, and burst resistance required for riding. It lacks the impact protection inherent to dedicated armored motorcycle gear and offers minimal abrasion defense.
What is the difference between CE Level 1 and Level 2 armor?
The difference lies in force transmission. CE Level 1 pads transmit less than 18kN of force (adequate for lower speeds), while CE Level 2 pads transmit less than 9kN. Level 2 armor absorbs significantly more energy and is the recommended standard for highway and tactical riding.
Can I wear motocross armor on the street?
Generally, no. Motocross gear is designed for impact protection on dirt but often lacks the abrasion resistance required for asphalt slides. For street operations, ensure your armored motorcycle gear carries a slide rating (A, AA, or AAA) to handle pavement friction.
When does armored motorcycle gear expire?
Helmets generally have a 5-year shelf life. For textiles and armor, inspect for UV degradation, fraying stitching, or hardening of foam inserts. Be sure to check our Helmet Safety Guide for specific lid expiration dates. If the structural integrity is compromised, replace it immediately.
Can I upgrade the armor in my current jacket?
Yes. Most reputable gear features pockets for armor upgrades. Swapping standard foam for D3O or CE Level 2 armor is a cost-effective way to significantly increase your safety margin. See our full Gear Maintenance Guide for instructions on swapping inserts.
Secure Your Safety
Riding is an exercise in calculated risk. You control the bike, but you cannot control the environment. Investing in high-quality, armored motorcycle gear is not about buying accessories; it is about investing in your ability to walk away from an incident.
Assess your current kit. If it lacks designated impact protection or uses inferior materials, it is time to upgrade. Equip yourself with professional-grade gear and ride with the confidence that you are prepared for the slide.